PLEASE NOTE: This article has been archived. It first appeared on ProRec.com in August 2002, contributed by then Senior Editor Bruce Richardson. We will not be making any updates to the article. Please visit the home page for our latest content. Thank you!
After a Fung Shui makeover for my studio, things sounded bad. Velly bad. My seven year old Sonex, besides being butt-ugly and crumbling into dust, was hardly up to the task of controlling my now pristine and reflective surroundings. My chi was on crack, my dragon was swimming down the river. My computers, once effectively silenced by my piles of junk, were screaming so loud I couldn’t hear anything. Enter Auralex and RaXXess, with solutions that surpassed my every expectation.
Too good to be true?
I’d seen Auralex in many friends’ spaces and appreciated its clean and non-crumbly look. In my new desparation, I figured I’d pick up some odds and ends to supplement my existing Sonex. I was thumbing through their slick little catalog when my glance fell upon an interesting offer. Plot my room dimensions and gear placement, it said, and Auralex would compute its deficiencies, then devise an acoustic treatment plan which would give me a world-class space. For free.
Wow. Free. Good. Lightbulbs. Then doubts. This is way too good to be true.
My little producer’s nook is about as wrong a space for mixing music, much less recording it, as exists in the world. When my wife and I purchased our groovy craftsman/deco home a few years back, I gave up the precious backyard studio I’d designed from the ground up, and moved into a roomy spare bedroom in the new pad. Great light, great view, but no perfectly angled walls and ceilings, no soffits, no built-in bass traps. I was back in bedroom land, and hating it. I intended to build another backyard studio, but got the quote and ditched the idea, deciding a lap pool and spa might be more fun. It is.
But here I remain, stuck in a bedroom. I can, and do, rent some great studio space around town when I need it. Dallas has some of the nicest rooms around at good prices. But I want that killer-room experience in my own sandbox. I don’t expect or really even need isolation. My neighbors are cool and far enough away that they’re not bothered by a little bleed. Conversely, my neighborhood is peaceful enough that I’m fine recording all but the quietest things. What I needed was a listening environment.
The Consult
I decided to give Auralex a shot, and called the 800 number from the catalog. A cheerful Jeff Hedback answered the phone. Sure he could help me, came the cheerful answer. Turns out Jeff is a bass player and recording musician himself, and can totally relate to my predicament. Predictably enough, I thought. After a few moments conversation, my skeptical side began to surface. Rays of golden sunshine probed my poopy-hole as Jeff regaled me with success stories. My little bedroom studio would be a hit factory in mere days. Beyond my wildest imagination. Just send those plots–we’re all over it.
Fair enough.
Send the plots I did. I am no slouch at drawing, so I proceeded to lay out every piece of gear, window, door, electrical outlet, coffee cup, and mousehole for Jeff. My sunburned chute was raising my expectations. Now I wanted it all–great sound at the mix position, great sound in my comfy new ever-so-chic client chairs, a perfect vocal recording environment…and yes, oh yes: I wanted to spend no more than the cost of a computer on the deal.
So I faxed the plots to Jeff. He called back immediately, saying he’d cured far worse spaces. All I needed was a little bass trapping, a little diffusion, and some absorption. I’d be happy as a little girl. Tell him what look I wanted, and he’d go to work on the plan.
Could it happen? A few days rolled by, and a cheerful Jeff phones me up to say he’s all done. He has run my plots through the Auralex think-tank, and my acoustic treatment is fully designed. Jeff and his colleagues have discussed my aesthetic desires as well, and have tried to make the placement both elegant and effective. He thinks I’ll like it.
The Prescription
Jeff continued, telling me that I needed a rather classic treatment. From behind my monitors to just behind the mix position, I needed heavy absorption to kill both the excess bass and any reflections that would smear my stereo image. This translated into four-inch foam panels with fairly full coverage. Behind the mix position, I needed more absorption, but lighter; just enough to kill excessive bounce. Also, I needed some diffusion in the back half of the room. This would add perceived size, provide a nice lively recording area, and prevent any ping-ponging of sound between the ceiling and floor. The diffusers would route reflections harmlessly to the absorptive walls, without “killing” the space. My closet-turned-vocal booth would get a mix of two and four inch foam to counter a nasty 400 Hz response hump, and finally, I would need some bass trapping to control excessive buildup. Ironically, this bass buildup was responsible for my room’s lack of deep bottom end–the bass was there all right, just being canceled.
Asking me if I was looking at my plots (I was…), Jeff continued to detail the treatment. There would be an array of four inch foam and six “T-Fusor” diffusers centered on the ceiling in a six-foot by eight-foot rectangle. Floor to ceiling arrays of four-inch foam would be spread behind the monitors, in two-foot vertical strips spaced about four inches apart. A big square patch of two-inch foam would be mounted right behind my clients’ heads. The back wall would get thick window treatments and a few patches of four-inch foam. Finally, each corner would get a space-age-looking bass trap array, consisting of several “Lenrd” bass traps extending all directions from a one foot square corner block.
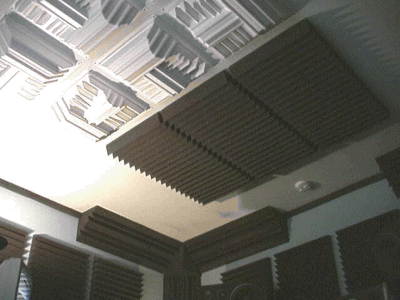
12″ Corner Blocks and 2″ Corner Fills work together to make an effective and easy installation.
The area directly under the T-Fusors is killer for tracking vocals.
An important element of the treatment–no carpet on the floor.
Price for all this? Jeff proudly announced he’d met my challenge–the entire package would come in at about $2500. Turns out they don’t direct ship, so he hooked me up with a dealer. All he needed was my credit card number, and my Hit Factory In a Box was Texas-bound. I took a deep breath, closed the deal, and made myself a stiff drink.
Arrival
While waiting for Mr. FedEx to arrive with the goods, I busied myself prepping the room. First, I ditched the Sonex arrays, leaving a trail of foam crumbs behind me. I have to say that Sonex is one horrible product, at least in my experience. I paid out the ass for it, I have treated it well, and it has simply disintegrated to pure crap in seven years time. I call Jeff, and ask him if my Auralex will be dumpster-bound in seven years, and he says it will outlive me. Better living through chemistry? That’s another story, I guess.
For the first time in these seven years, I was regaled with the pure truthful depth of my room’s mediocrity. It sucks. Somehow, it manages to be boomy, bass-weak, and harsh–simultaneously. I couldn’t work, so I busied myself painting, filling holes, polishing floors, and marking the mounting positions for the various components. I hit deadlines in headphones, and crossed my fingers. This needed to end. Fast.
Shipping foam cross-country is an inexact science. What starts out on one truck ends up split among many, as these giant, relatively featherweight boxes share space with smaller, more profitable packages. The first thing to hit my doorstep was a box full of spray glue cans and the diffusers, along with what appeared to be foam “sticks.” I called Jeff, and he explained these were two-inch corner fills. I’d figure out where they went after the big stuff was up.
Since the foam hadn’t all arrived, I mounted the diffusers. Instantly, the sound got better–way better. This got me pretty excited. The room was still plenty live, but the ringiness of yesterday was gone. I called Jeff, and he laughed a little at my enthusiasm.
“Just wait,” he told me.
Over the next two days, a steady stream of cardboard-packed foam hit my doorstep. Unpacking it, I built a small mountain of foam in an adjacent room. What amazed me was how dead quiet this room had suddenly become–walking into it was like walking into a vacuum. All components accounted for, it was showtime.
Installation
I saved the cardboard boxes, which gave me plenty of masking material. I covered my gear in cardboard “tents,” spread dropcloths, and made a little spray station in the next room.
Some tips are in order here: first the spray station. Make about a 4 x 8 foot cardboard “rug” and open some windows. Spray glue is a crappy buzz, and it will make your offspring grow flippers. Better yet, wear a respirator.
To do a clean job, have a stack of old newspaper handy. Lay a fresh layer atop your cardboard after spraying each piece (no need to remove “glued” paper, just keep adding). This will keep any overspray from sticking to the surface of the next piece. Although a little overspray will wipe off fairly invisibly, don’t push your luck. More than just a little bit will show.
Cut a box flap to use as a spray shield, placing it about 1/2 inch inside the edge of your foam, then start spraying glue in the center of each piece and work outwards. Soon you’ll get the hang of the can’s nozzle, and you’ll be confident spraying right up to the edge of the foam. Move the spray shield around the edge as you go, and you’ll have a neat job. Mark the position of the foam on your wall, and spray likewise, using your shield to keep you within the lines. When the glue tacks up on both surfaces, carefully line up the foam and stick it to one edge, working your way across.
The first “stickdown” is the critical one. Take your time, because once you’ve got it straight, you’re good to go. Use a light touch, and if you see your foam going down out of square, carefully peel back and try again. Once you’re in place and happy, tamp it all over with your open (clean and glue free) hand, and it’s set. Rinse and repeat.
If you’re really paranoid about your foam-sticking ability, use an old Formica-applicator’s trick. Get several strips of wood lath just longer than your foam’s width, and after the glue tacks up, lay these across the back of your foam a few inches apart. Don’t put glue on the sticks themselves, they’ll stick to what’s on the foam just fine. Gently put the foam, sticks and all, against the wall and get it lined up. Pull out the bottom stick, press down your edge, and make sure you’re still square. Then, roll the entire piece away from the wall from the top, start removing sticks and rolling the piece back onto the wall, from bottom to top.
Mounting Lenrds is trickier than the sheets. First, you must mount a one-foot square corner block, which gets glue on three sides. Because it’s a big hunk-o-foam, and you’re sticking it into a corner, one edge or another will tend to stick first. The stick trick is worthless here, because you must get the corner as tight as possible to get the best bond to all surfaces. I found the best success by just very carefully keeping the foam 1/2 inch or so from one surface, and moving it slowly towards the others. When all surfaces are equidistant from the corner, just push straight in at a 45-degree angle. If one side sticks first, holding the other away, then carefully peel back and start over. If you don’t get a good bond on all contact surfaces, it will fall, so take some time and do it right. Once the corner blocks are in, the Lenrds themselves are easier. Still you must be very careful to get the piece tightly into the corner before you allow it to “stick” or you’ll be re-doing your work later.
Five golden words: Don’t spare the spray glue. I followed the directions on the can, spraying both surfaces lightly and allowing the spray glue to “tack” before I began sticking the components to their assigned positions. But I was a little stingy with the glue. My first efforts failed, various pieces of foam peeling away or falling from the ceiling. A bass trap fell and bonked me in the head as I rang Jeff up.
“Use more glue,” came the answer. “We sent you plenty, don’t be shy.” Well, I tried that, too, and got bonked once again. I called Jeff, this time a little agitated. It seems that despite the best intentions and design, some paints just don’t play nice with the spray glue. He suggested a few finishing nails here and there, and this did the trick perfectly. I found that squishing the foam down just a bit while driving the nails, then pulling the foam back over them, resulted in a completely invisible fix. Now, several months down the road, the LENRDS are still hanging just fine.
There is a more hardcore glue, which is applied with a caulk gun much like construction adhesive. However, if you think you’ll ever want to remove the foam, I’d opt for the spray glue. Once I copped the finishing nail trick, I haven’t had any problems with things coming loose, and the guys at Auralex send plenty of glue with the order for a few mishaps. This wasn’t their first rodeo, only mine.
Final Analysis
Here’s where I get to say, unequivocally, that the installation was a success.
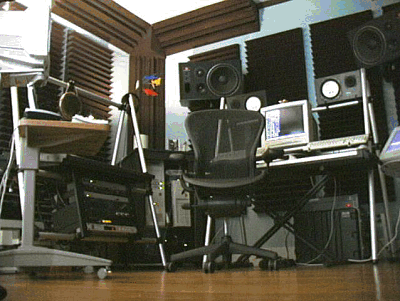
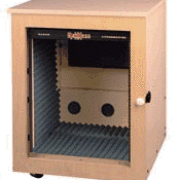
killing bass buildup and absorbing exhaust fan noise from the Isoraxx.
Inside the case, three loud computers make less sound than the room’s AC vent.
The bass in this room just makes me grin ear to ear. It’s huge, deep, and tight. If I hear boomy bass, I know it’s the mix, not the room. The imaging is spectacular, with sounds so pinpointed in location I feel like I can touch them. And it’s so friggin quiet in here I people walk in and say “wow” before they’ve heard a thing coming from the speakers (although, as you’ll read later, there was another hurdle to overcome). It’s a serious listening room.
But not only that, it’s a serious tracking room. I had my doubts about this promise, but no more. The first task on my plate was resampling a conga drum I’d done badly before. I placed the conga directly on the hardwood floor, immediately under the diffuser array. I placed a single mic about 12 inches from the drum only to find it was way too close. In my previous room, I’d already be drowning in reflections at this point…so far so good. I moved the mic back to about three feet, and still, the sound was very intimate, but the full tone of the drum had now developed. I sampled about thirty hits, and played back the track. It was “big studio” sound, all the way–clear, crisp, present, and intensely focused.
Tracking project number two was a female vocalist with a very low, quiet, seductive sort of voice. Here again, I generally track her at inches from the mic and roll off bass later, but I tried about sixteen inches. Now I was getting excited. The track came out great, and fit into a huge pop orchestra mix with no EQ at all.
I played some flugelhorn for some commercial tunes, and here I was able to open up the distance to between three and four feet and still get a very present track, but without all the harshness and lack of presence that a closer mic’ed flugel can have. One of the big ironies of mic’ing solo trumpet and flugel is that you can’t get them to come out in the mix if you’re mic’ing too close. The sound gets too spread, and by the time you get it out there where it can be heard, it’s killing everything else. But if you back it down where the other instruments come through, it sounds wimpy. Not here. I was able to get the sound I needed at the distance I wanted, and the resulting tracks popped right through the combo mix without taking over. I was in hog heaven.
Acoustics 101 I’m an informed consumer when it comes to acoustics. Not only did I study it in college as part of my degree plan, I have built a handful of spaces over the years. The biggest thing to remember is this: Isolation (keeping sound in or out of the space) has nothing, I repeat, NOTHING to do with absorption (preventing sound from bouncing around within the space). I spoke with Chief Acoustical Engineer Jeff Szymanski at Auralex, who offered this advice and analogy: “Isolation and room reflections are separate problems. Materials good at helping with one are usually lousy at helping with the other. Foam cannot stop sound. Dense wallboard cannot absorb reflections. Think of it this way. Standing under an awning in the rain protects you from getting wet. Standing under a big sponge probably wouldn’t be advisable. The awning blocks the moisture. The sponge absorbs the moisture, but otherwise allows the water to pass through it. Acoustical barriers help block sound from going through the wall. Acoustical absorbers minimize reflections in the room, but otherwise still allow sound to pass through them.” You won’t find a much better resource detailing these issues than the “Acoustics 101” section at Auralex.com. These guys have been stellar at providing information throughout the course of this review, and Acoustics 101 is a treasure trove of hints and specific construction methods which will help you identify and solve your acoustic problems. My problem was all about absorption, nothing about isolation. But if you’re dealing with leakage in or out, just remember that foam ain’t gonna cut it for that, and you’ll need to bone up on some studio design basics. Check out Acoustics 101, and you’ll be an educated consumer in no time at all. |
More tricks in the bag: GRAMMA
Next up was some electric bass. Here’s where I was totally screwed before, getting pathetic amped sounds and always opting for direct input or a mix of the two. Jeff sent a little bonus surprise (sometimes technology writers get little suprises), a pair of new Auralex products called GRAMMAs. These are little gray-carpet covered platforms, amplifier size, with very stiff foam 2 x 4s glued to the bottom along with some Barney-purple wedge foam and a plastic carrying handle. The theory goes that isolating the amp from the floor results in a less boomy, more directional sound. They’re also used well for other purposes, like isolating drum overheads from the floor or a vocal mic from a happy-footed singer.
Sure enough, our bass rig had a clearly deeper and more focused sound when sitting on the GRAMMA. This was a small-footprint Trace, a bigger rig might require two GRAMMAs. I used the other one under the mic, and got a fat, well articulated bass sound that was far better than anything I’d gotten without renting nice studio space.
I was working on an acoustic bass recording project next, and in addition to testing some new mics, I also did some a/b testing with and without the GRAMMAs (under both instrument and mic stand). Here again, the bass was both deeper and far better imaged with than without. Makes sense–bass gets everywhere, and if you can keep it out of the floor and mic stand, then you’ve just eliminated two huge resonating forces.
The GRAMMAs are cool. Thumbs up!! I would recommend these for any studio guitarist or bassist. Jeff says they really work well on stage (I haven’t tested them live, yet), and certainly I can see how this would be true. Most club stages are highly resonant, and portable large-venue stages are even worse–generally plywood skins on parallels or putt-logs with no damping at all. Any amplifier energy that’s getting absorbed by the stage is not working for you. GRAMMAs provide some very good portable isolation, putting all the energy into the air where it counts.
I did try to test this theory somewhat. I took my JBLs off the wall mounts and placed them first directly on the hardwood floor, then on the GRAMMAs. No doubt, there was an immediately noticeable improvement in the quality and imaging of the bass sound–flabby and spread without, controlled and tight with.
Finally, a male voiceover rounded out my recording tests, and here we used a distance of a little over one foot to achieve a very intimate sound that still had room to breathe. As luck would have it, he had an extreme case of happy feet, so I put the microphone AND him on the handy GRAMMAS, to excellent result.
Jeff’s Two Cents
I’m always happy to let someone else type awhile. Here’s what Jeff had to say about the project:
First, it’s always a pleasure assisting someone who is passionate about their room. In this particular application, the biggest issue was Bruce’s desire to have two functional mix positions: NS-10’s on the front wall and the JBL’s suspended from the ceiling at angles off the front wall and left sidewall, facing the client listening position. Therefore, I suggested high NRC absorbers (4″ Studiofoam) on both of these wall surfaces (with a pretty healthy percentage of coverage). As it turned out, Bruce decided to mount the JBLs of the front wall, creating just one “mix view”. In light of this new information, I would have most likely suggested 2″ Studiofoam for the left sidewall. No harm no foul, the 4″ Studiofoam should and seems to have worked very well. Bruce also desired to have LENRD bass traps installed continuously in the vertical and horizontal corner junctions. This is acheived by placing a 12″ CornerCube in each upper corner junction, then extending out with the LENRDs as desired. The decision to place the additional LENRDs (a minmum suggestion would be two units per corner) matched Bruce’s application very well, reducing both vertical and horizontal modes, while creating a clean visual presentation.
Yeah, what he said. I initially planned to give my clients a perfect mix position too, but I am just too much all about me, I guess. I want my seat to be the best in house all the time, so I pointed the JBLs my way. But I also mounted them with nice swivel arms (actually, hardcore TV wallmounts), so they will extend and open up, giving the client position a very nice soundstage as well. Best of both worlds. I am happy with the 4″ foam on that side wall–since I do a considerable amount of theater sound design, I sometimes have to work “loud,” and the extra absorption really helps me avoid oversaturating the room. The only downside–a little more broadband absorption means I run my amps a little hotter. No biggie.
The Rip Report
Next, I invited esteemed fearless leader Rip Rowan over, and told him to bring some mixes. A little background may be in order. Rip gives me a ration of shit about both my room and my choice of speakers. Call me a luddite, but I see no reason to replace either my NS-10s or my JBL 4412s until some bonehead breaks in and steals them (that’s not an invitation, by the way). They’re speakers, I can hear them, I like them, and lots of hit songs have been mixed on both models. Talk about inexact science. The voodoo associated with speaker design cracks me up, sometimes. Humbug, I say. There’s nothing wrong with my speakers. I was about to prove it.
Rip showed up, admires my slick new look, sneers at the JBLs, and pops in a CD. A few seconds go by, and he says, “Can you close the door behind you? I’ll be here a while.”
Later, over sushi with Rip and Robin Hood Brians, we come to the conclusion that sometimes you don’t need another new computer, or the latest tri-amped boutique monitors. Sometimes you don’t need that fifth mic preamp or that trendy new plugin. Sometimes, you just need a little love, and Auralex laid a lot of love on my little room. Enough to make our resident monitor snob actually say–out loud, mind you, and I quote:
“Those JBLs sound killer.”
