PLEASE NOTE: This article has been archived. It first appeared on ProRec.com in September 1999, contributed by then Editor-in-Chief Rip Rowan. We will not be making any updates to the article. Please visit the home page for our latest content. Thank you!
Spatial processors are all the rage. Just about every effects package comes with some kind of “stereoizer” effect. What do these effects really do? How should they be used? And which ones work the best? I spent some quality time getting my head into this technology, trying to understand what these different tools are doing, how they work, and which ones I like the best.
About Spatial Enhancers
First, a little history on the origins of 3D audio technology. A few decades ago, designer Bob Carver achieved a degree of fame for a stereo preamplifier that included a technology with the eyebrown-raising moniker of “Sonic Holography”. Like a visual hologram, sonic holography promised the listener an immersive, 3-D experience in which the music would extend behind, before, and around the speakers – creating the illusion of a believable soundstage that extended, in theory, beyond the walls of the listening room.
Carver wasn’t the first guy to do something like this, but as far as I know, he was the first guy to actually sell a significant quantity of the technology. The exciting part was that, when it worked, it really worked – you really would hear sound around and beyond the speakers, with added depth of field and, just sometimes, startling realism.
Unfortunately, it had a few drawbacks. First of all, to actually hear the effect in a believable way, the listener had to be on the exact centerline between the speakers. Get just a few degrees off, and the effect is lost. Secondly, sometimes the effect wasn’t all that great. It seemed to work best on jazz and classical recordings where good stereo miking techniques were employed. Rock music, with its bizarre miking tricks, often resulted in just plain weirdness. And finally, the Sonic Hologram occasionally played havoc with the image’s center, resulting in lost vocals or lead instruments.
So what is it about stereo sound that Bob Carver thought needed fixing?
The problem is stereo itself. As wonderful as it is, stereo cannot provide the exact experience of live performance. It is inherent in the design – two speakers create four sonic arrivals. The other problem arose with the advent of the mixer’s pan knob. When you pan sound from the center to one side, the knob basically functions like a kind of volume knob, turning down the volume of one channel and turning up the volume of the other channel. This causes the sound to move from center to one side. So the pan knob will move the sound from center to either side, but it cannot push the sound “back” from the speakers. Nor can it push the sound outside the speakers.
What the heck am I talking about? What are sonic arrivals? And why sound you care? What does it mean to say the sound is “outside” the speakers? And what’s wrong with stereo, anyway?
First of all, let’s consider a listening experience.

Here’s a guy listening to a guitar. The guitar is over to the left, so sound from the guitar arrives at the listener’s left ear slightly before it hits his right ear. Also, the sound arrival at the left ear is marginally louder than the sound arrival at the right ear.
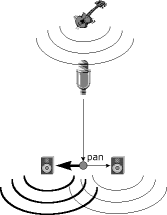
Now let’s record that guitar with a mono microphone and pan it over to the left to reproduce the sound. As you can see from the diagram, the result is that each speaker reproduces sound at exactly the same time, with the left speaker reproducing that sound at a louder volume.

When our listener experiences the recorded sound, the sound from both speakers arrives simultaneously. The result is that the guitar’s sound seems to originate to the left of center on an imaginary line somewhere between the speakers. You want to create a flat, lifeless mix? Just record everything mono and pan it. Every sound in your mix will seem to originate somewhere on a line between the speakers.
No problem, you say. We will just use a nice spaced pair of mics to record our guitar. After all, stereo works, right? This diagram illustrates miking a guitar with a pair of mics.
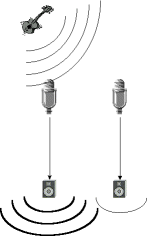
As we can see, we have solved the problem of both speakers reproducing the sound simultaneously. Now the left speaker will reproduce the guitar before the right speaker, and just a little louder than the right speaker. This will result in a sense of depth of field not present of the panned sound. With good miking, the sound will seem to emerge slightly behind the center line of the speakers.
This is why I always try to make sure that at least a few instruments in every mix are miked in stereo. Even if only one or two instruments are miked in stereo, the result is an overall depth of field and realism for the whole mix.
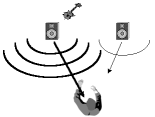
But wait! We haven’t told you the whole story! Before, when we just had a guy listening to a guitar, we only had two sonic arrivals. The sound from the guitar reaches the left ear, and then the right ear, creating two arrivals. But with stereo reproduction, we have two speakers. Each ear always hears both speakers. With stereo, there are always four sonic arrivals.
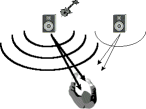
Suppose, now, we take the left channel, reverse the polarity, delay it a little bit, and inject a little of the delayed, inverted signal into the right speaker? The result is that the inverted, delayed signal is capable of actually canceling the sound from the left speaker before it reaches the right ear. Confused? Check out the diagram.
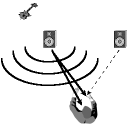
So what we have done here is to cancel the sound from the left speaker before it reaches the right ear. If we do the same for the right channel, then, in theory, each ear only hears the sound from one speaker. The result is that sounds can now appear from behind and outside the perimeter of the speakers – in some cases, from beyond the walls of the listening room. Now our guitar sounds like it is coming from behind and beyond the speakers.
Such is the basic concept of all 3D audio technology. Different implementations of the technology use variations on this theme, but the basic concept of injecting out-of-phase information into the signal remains a constant.
Flies in the Ointment
To say that this technology works perfectly would be a serious overstatement. There are several problems inherent in it.
First off, this effect is only capable of providing realism when the listener is between the speakers. To be sure, the sound is “bigger” throughout the listening room. But true positioning only occurs when the listener is roughly on the centerline between the speakers.
Secondly, the process always uses some kind of out-of-phase or delayed program content. The potential always exists to really mess with the bass content of the program due to canceled bass. The tools usually provide a way to prevent ruining the bass content, but some bass cancellation and phase artifacts are usually inevitable.
Finally, serious scrutiny of the technique will reveal that, of course, both ears also hear the out-of-phase content. So now, instead of the usual four sonic arrivals we have with stereo, we can have up to eight arrivals! The technology is designed around this fact – but nothing’s perfect. When 3D techniques don’t work, they can confuse the brain and blur the stereo image.
Applications
Spatial processors and enhancers can be used in two ways: as channel inserts on a multitrack mix, and as mastering tools applied to an entire mix. Mixing engineers can use 3D tools to push certain sounds beyond the plane of the speakers, so that certain instruments are pushed back into the mix, pushed outside the stereo image, or wrapped around the listener on both sides. Mastering engineers use 3D tools to take a flat, 2D mix and add depth of field to give the sound size, weight, and depth.
When a processor allows you to place a mono sound in 3D space, we call it a positionalizer. When a processor widens or deepens the stereo image, we call it an enhancer. In general, positionalizers are used as track inserts, and enhancers are used on entire mixes during mastering.
So that’s basically how they work. Now let’s look at three tools for 3D stereo processing and see how they perform.
QTools/AX
QTools/AX from QSound Labs is a set of three plugins to provide your audio with a level of 3D-ism. Each plugin is designed for a particular purpose. Two plugins, Q123/AX and Qsys/AX are typically used as track inserts to stereoize or positionalize sound in 3D space. The other plugin, QX/AX is used to enhance a stereo track or mix to add an extra dimension to the sound.
The user interfaces are simple and straightforward. A nice brushed-metal appearance gives these apps a solid look, and large, intuitive controls make them super easy to use. Each plugin offers a pair of large meters and a bypass switch. The plugins include a very well-written help file describing all the concepts employed as well as excellent instructions for using the plugins. Example applications for each plugin are provided to get you started using them.
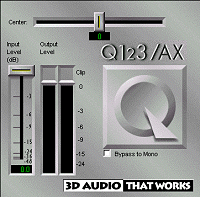
Q123/AX is a mono-to-wide-stereo plugin. It does not positionalize sound in space, rather, it is designed to create a pseudo-stereo image from a mono signal.
Interface options are simple: input gain and balance controls. The gain control controls the input level to the effect, to prevent clipping. The balance control is just a regular balance control and is used to move the stereoized signal to one side or another. Level meters are provided with clipping indicators to help set gain levels.
QSound Labs does not explain the exact techniques used to create their effects, but this effect is almost certainly a stereo comb filter. Imagine a 10 band stereo equalizer, the kind found on many home stereos. Now imagine that on the left channel, starting at the first fader, you pull every other fader to full cut. On the right channel you do the same thing, except you start at the second fader. The result is that the frequency content of the mono signal is more or less split into left and right signals, creating a stereo image.
Comb filter expanders typically use a delay to create the comb effect. The delay also produces an out-of-phase quality. The result is that the processed signal is quite spread out across the speakers.
In use, Q123/AX (and other similar tools) is not well-suited for an entire mix, or for any signal where you need to preserve the sonic integrity of the recorded sound. Q123/AX creates a strong effect that definitely changes the color of the sound.
However, for “special effects” this process can be invaluable. For example, perhaps you have a sound effect – like rain, or crickets, or someone speaking in the background – that needs to be “outside” the mix. Q123/AX can be used to move the sound out of the way of the music, to make it sound as though the effect is not coming from the playback system.
This effect is a great way to stereoize an old mono effect box. Examples include tape and analog delays or old reverb units. This effect could be very useful in loop-based music, to add a cool color to a break section or a drum loop. I could also see this effect being useful in a post-production situation to push an off-camera voice-over off the soundstage, so that the voice sounds like it’s coming from somewhere offscreen.
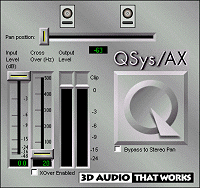
QSys/AX is a mono-to-positionalized-stereo processor. It is designed to be used as an alternative to 2D pan knobs.
Like Q123/AX, QSys/AX offers controls for gain and position. However, this is a positionalizing control, not just a balance control. Two speakers are shown above the position slider. As you move the slider towards one speaker, the audio balance is shifted towards that speaker. Then, as you move the slider past the speaker, the effect “kicks in” to add out-of-phase content to the other channel, pushing the sound out past the speakers. It’s a great, brain-dead simple interface.
QSys/AX also includes a crossover control. This allows bass frequencies to pass uneffected, reducing the bass loss from phase cancellation.
This plugin is designed to take the place of a pan control. Its effect is best when only one or two instruments are processed with it in a multitrack mix. The unprocessed tracks provide a “foundation” for the stereo image, locking it down more or less between the speakers. Then, processed tracks can be pushed outside this foundation, creating dramatic space in the mix.
Examples of applications include any instrument that needs to be pushed back in the mix or off the soundstage. You could use QSys/AX to push a rhythm track way off to the side, or to get a direct sound, like a keyboard, to sit back in the mix. This could also be a great effect in post production where a voice-over needs to be positioned far to the right or left of the screen. Since it has a crossover control, you get a reasonable amount of control over sonic artifacts and coloration.
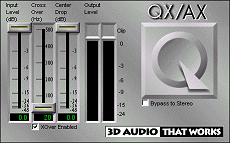
QX/AX is a stereo-to-wide-stereo processor. It is most useful in mastering situations where the mix has an overly mono, 2D sound and needs some depth and breadth. Controls are provided for gain and crossover, to control the input to the processor and to help control out-of-phase or cancelled bass.
QX/AX also includes a “center drop” control that controls the amount of pure mono information that remains in the mix. As this control is lowered, sound is pushed from the center to the perimeter. Set it too low, and you can hollow out the center of the mix, reducing mono signals like vocals, and creating a kind of emptiness. As with any processor that you might use on a final mix, care must be taken to ensure that you don’t ruin the mix.
This plugin also has great utility as a track insert on a stereo track in a multitrack mix. Stereo pads, background vocals, and drum overheads can be processed with this tool, spreading out the stereo content and lowering the “center” volume.
One drawback with this processor is that there is no way to achieve a very subtle effect. There is no control to limit the amount of out-of-phase material – only the Center Drop control, which can make the effect stronger, but not weaker.
Overall, these effects’ strong suit is that they are specialized and simple. It’s just a no-brainer to grab one of these tools and make it work. Unfortunately, the simplicity comes at the cost of flexibility. There are a few features missing from these processors – primarily the missing effect level control – that occasionally hampered my ability to apply them.
I was also surprised to find that these were the most CPU-intensive plugins of the bunch, consuming 5% of my CPU in SoundForge. That’s not a major problem, after all, 5% CPU usage is much less than the consumption of a powerful compressor or reverb. But I would have expected the simplest plugins to offer the best performance. Such was not the case.
Hyperprism-DX
Hyperprism-DX by Arboretum Systems is a complete package of DirectX effects including effects from the practical to the freaky. Included in the package are two tools that can be used to enhance or synthesize a stereo image: More Stereo, and Quasi-Stereo.
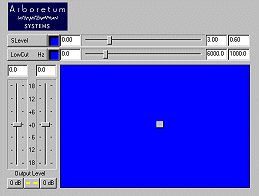
More Stereo is quite similar in function to QX-AX. The interface is simple enough. The SLevel control adjusts the level of discrete stereo information in the mix. As this control is adjusted to levels above 1, the mix becomes more stereo. If this control is set to levels less than 1, the mix becomes more mono. Since this effect uses out-of-phase information to spread out the stereo image, a low-cut (crossover) control is used to allow low frequencies to pass uneffected.
Like QX/AX, this processor can be used effectively in a mastering situation to add depth and breadth to a flat, 2D mix. It can also be used to widen the stereo image of a stereo track in a multitrack mix.
I appreciated the fact that this processor allows full control over the effect depth. SLevel values only slightly above 1 produce a subtle, gentle effect that would be undetectable without a direct A/B comparison with the original.
This was the most processor efficient plugin of the bunch, utilizing barely 2% of my CPU as measured in SoundForge.
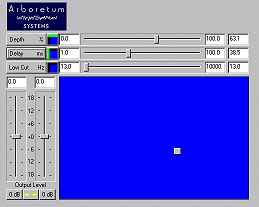
Quasi-Stereo is a comb filter processor that is used to create a wide stereo image from a mono signal. Like Q123/AX, this processor will stereoize a mono signal, spreading it out across the soundstage.
Quasi-Stereo offers unique and flexible controls over its processor. There are controls for Depth (the percent of the signal that will be processed), Delay (which controls the comb filter’s delay) and a low-cut (crossover) control.
Since Quasi-Stereo gives you control over the effect’s delay, really cool special effects can be created by setting this control to a high setting, including cool stereo slapback and delay effects. At lower settings this control effects the width and color of the effect. The Depth slider gives you control over the amount of effect applied to the signal, with effects ranging from subtle to extreme.
When coupled to the effects “Blue Window” interface some interesting special effects can be had. By setting the Blue Window joystick to control the depth and delay, some far-out effects can be created by moving the joystick around, modulating the delay and depth. The image widens, delays, and collapses. Pretty interesting stuff, especially for trance or dance music where bizarre and extreme effects are the norm.
This effect was less efficient than the More Stereo effect, using 5% of my available processing power.
Waves S1
Waves S1 is a multipurpose stereo imaging processor. It can be used both on stereo track inserts in a multitrack application as well as on mixes in a mastering application. Like other Waves applications, it optionally includes Waves IDR dithering algorithm for mastering applications.
On the PC, the S1 is only available in the Waves Native Power Pack bundle. This package includes Waves’ C1 compressor suite, the Q10 EQ suite, the L1 UltraMaximizer and Waves’ famous TrueVerb reverb.
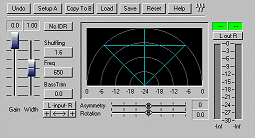
The S1 is a complex processor with a number of controls. Let’s start on the bottom with two controls that effect the position of the sound on the stereo soundstage: Asymmetry and Rotation.
Asymmetry is used to adjust the relative dominance of either channel in the mono program content. With the control in the middle the image is uneffected. Now, for example, you drag the asymmetry control to the left. As you drag, the left channel is emphasized in both speakers. If you set the control to the far left, then the output is “mono, left” meaning both speakers are playing only the left channel.
Rotation controls the position of the mono portion of the signal, leaving the stereo portions unchanged. As the control is adjusted to one side, the “center” moves to the side, until all the mono program content is in one speaker, leaving only the discrete stereo information in the other speaker.
Therefore, by using Asymmetry and Rotation in conjunction, a balance control can be simulated. For example, let’s drag both controls to the right. As Asymmetry is dragged to the right, the signal is more “mono, right”, and as the Rotation control is dragged to the right, the “mono” portion of the signal is right-panned. At the far right, you hear only the right speaker playing the right channel. Just as though you turned the balance to the right on your stereo.
These controls are very useful in making precise adjustments to the balance of an overall mix. Asymmetry lets you control the staging of the stereo portion of the mix without shifting the center of the mix to either side, and Rotation lets you control the location of the center of the mix without losing the stereo program content.
Therefore you can also use these controls to effect a stereo track in a multitrack mix. Perhaps you are recording a remake of “You Can’t Always Get What You Want.” You have taken great care to get a stereo recording of a choir singing the refrain and “aahs” at the end of the song. Now it’s time for the Big Mix, and suddenly you decide that instead of running the choir up the middle in stereo, you want them to be over to the right. But if you use a balance control you’ll lose the information in the left channel, and the basses will be overemphasized. And if you run this as a pair of mono tracks, and pan them both to the right, then the stereo image will be lost. You’re screwed.
Enter the S1. Using the S1 as an insert on a stereo track in your DAW, you simply move the Rotation control to the right. Amazingly the choir moves to the right – but the left channel still retains all of its discrete stereo information, providing a broad soundstage. If you like, you can adjust the asymmetry to bring the altos up a little in the mix.
So that’s how the S1 lets you control the positioning of stereo on the soundstage. Other controls are provided to control the width of the soundstage.
The Width control adjusts the level of the stereo material in the program. By turning it all the way down, only the mono portion of the signal is retained. For example, let’s say you had a mix that consisted of a center-panned bass guitar and a full-right-panned acoustic guitar. With the width at 0, the acoustic guitar would effectively be removed from the mix, leaving only the center-panned bass. Conversely, by increasing the width, the guitar can be pushed outside the soundstage, widening the stereo image.
The Shuffling, Freq, and Bass Trim controls affect how the S1 handles bass frequencies. The S1’s “shuffler” is an algorithm that widens the stereo image of bass frequencies without the resulting phase cancellation that occurs with typical stereo enhancers. The Shuffling control increases the proportion of this effect that is applied to the signal. The Freq control sets the frequencies below which the effect is applied. And the Bass Trim is a simple EQ control to balance the perceived bass level after the Shuffler has processed the signal.
Finally, the S1 provides switches to reverse the polarity of either channel, or to flip the left and right channels.
The interface uses an interesting graphic display that reflects the processor’s effect on the sound, and which can be used to control the S1s parameters. The graph can be used to control the Rotation, Asymmetry, Gain, and Width of the signal. When you eventually grasp the S1s complexity, the graph can provide a useful tool for making quick adjustments to the sound.
If you read Ethan Winer’s article on vocal elimination, you might realize that you can use the S1 as a vocal eliminator. Just click the phase reversal switch on one channel to flip the polarity of that channel. Now drag the Width control down towards zero to isolate only the mono portion of the signal – which has been cancelled by the phase inversion. As you drag down you will hear the vocal, and other mono instruments, vanishing before your ears.
Another interesting -and more practical – application is to create mixes with broad and deep soundstages – without the out-of-phase feeling that sometimes happens when whole mixes are enhanced. To do this you need an application with multiple stereo buses – like Sonic Foundry Vegas Pro. Set up two S1s in two different buses. For the first one, start with the default settings and change these settings as a starting point: Width – 1.10, Shuffling – 1.5, Rotation – full left, Asymmetry – 20. For the other S1, use the same settings but change the Rotation to full right and Asymmetry to -20. Now, for anything in your mix that’s more than 50% panned left, route it through the first bus. Route the “right” content through the second bus. Now adjust the Rotation and Asymmetry controls to taste. You will find that the mix takes on a very three-dimensional character, yet centered sounds are completely uneffected and sound “tight” and centered.
The S1 takes a little learning, but it is certainly worth it in the long run. It is a classic example of the programmer’s motto that “flexibility requires complexity.” It took me a while to master the S1, but my mixes benefit from it. Even on conventional mixes, a little stereo enhancement and positionalizing can create a sense of dramatic realism without any sense that the music has been “processed.”
The standard S1, without the dithering routine, runs at a paltry 3% CPU utilization, making it efficient as well as powerful.
Conclusions
Each processor has its strengths and drawbacks. For sheer flexibility and power, you would be hard-pressed to beat the Waves S1. It offers great sound, excellent control, and superb efficiency. However, if you want it, you’re going to have to buy the whole effects bundle. You can read a review of the Waves Native Power Pack to get a better feel of the overall power of the bundle.
It’s likewise with Hyperprism’s processors. Their processors sound good and are quite efficient – but they can only be purchased as part of a larger bundle. I really like the Hyperprism-DX package – there’ s some fun, unusual, and efficient processors there. You might want to read the full review of Hyperprism-DX 1.5.5 to see if that package is right for you.
Finally, of the three packages, the offerings from QSound Labs were the least flexible and most CPU-intensive. However, they were also the only plugins that were available in a standalone format. And, they do sound good. If you’re in the market for stereo enhancers, and don’t want (or need) to purchase an entire software bundle, then these are the processors for you.
